

This series of classes is designed to make you more comfortable with your Cricut machine. Whether you have the Expression, Create, or the original Cricut, you will learn the basics for caring for your machine and mat, how to use all of the features of the machine and the cartridge overlays, and most importantly, you will learn how to adjust your settings to make the most of the material you are cutting. In the second class, you will have an opportunity to cut a variety of materials - give them all a try and see what you want to use. The third class will focus on not only the Cricut embossing folders, but optional methods of creating embossed images using your Cricut images. I also have a class that will give instruction with Cricut Craft Room (and Design Studio if you own that program), the computer software programs that allow you to manipulate the images on your Cricut cartridges. This is the same software that is in the Gypsy. Additional classes will be added to the series if people express an interest in a particular topic. So take a look and see what you can learn when you Explore Your Cricut!
If you own the new Cricut Imagine or the Cricut Cake
and are interested in these classes, please contact me.
and are interested in these classes, please contact me.
* * * * *
These classes have been HUGE successes.
Students left feeling much more comfortable with using their machines than when they walked in the classroom in the morning, and even if they've used their machine for a while, they felt they learned more about what it is capable of.
Some people who had been frustrated with their machine's performance discovered the ways to make adjustments and make their Cricuts cut properly.
Although we will spend time with all of the special features of the Cricut Expression and Create, students with the original machine found that the majority of the information pertained to them - and they learned "tricks" that allow them to do some of the same thins on their machine!
Those considering purchasing a machine might find it helpful to know what it is capable of doing before making their decision.
So EVERYONE is welcome in this class.
 This class will EXPLORE all of the Cricut's capabilities as well as special features of the cartridges. You will get hands-on practice with your machine, adjusting the settings and using all the features with various weights of paper - from vellum to lightweight chipboard. The goal is for you to make the most of your scrapbooking papers, because you will be thinking like your Cricut!
We will cover -


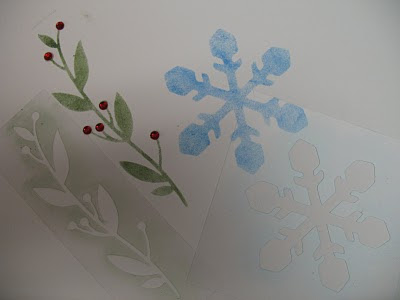
The card we create (the flower design to the left) will be done
without removing the mat from our machines.
We will utilize the "Fit to Page" as well as "Fit to Length" modes and
adjust settings as we use three different weights of paper.
This class is designed for owners of these Cricut machines:
Original - Create - Expression
A separate class will be held if you have the Expression 2
While we will cover all the functions on the Cricut Expression, those with the Create or Baby Bug will learn techniques that allow them to use some of the advanced features.
* * * * *
EXPLORE YOUR CRICUT - Part 1
Next class will be held when there is interest.
Contact me to see what the possible dates are.
Contact me to see what the possible dates are.
scrappingailaz@gmail.com
These classes have been HUGE successes.
Students left feeling much more comfortable with using their machines than when they walked in the classroom in the morning, and even if they've used their machine for a while, they felt they learned more about what it is capable of.
Some people who had been frustrated with their machine's performance discovered the ways to make adjustments and make their Cricuts cut properly.
Although we will spend time with all of the special features of the Cricut Expression and Create, students with the original machine found that the majority of the information pertained to them - and they learned "tricks" that allow them to do some of the same thins on their machine!
Those considering purchasing a machine might find it helpful to know what it is capable of doing before making their decision.
So EVERYONE is welcome in this class.

We will cover -
- Basic blade, mat and machine care
- Adjusting speed, pressure and blade depth for various papers
- Working with all the mode and function keys
- Making the most of the special keys on your cartridge overlays.

The center point feature on your machine was used to
cut out the wedding photo and create the frame.
The flip feature has been used on the butterflies
so they work on either side of the frame.

The card we create (the flower design to the left) will be done
without removing the mat from our machines.
We will utilize the "Fit to Page" as well as "Fit to Length" modes and
adjust settings as we use three different weights of paper.
This class is designed for owners of these Cricut machines:
Original - Create - Expression
A separate class will be held if you have the Expression 2
While we will cover all the functions on the Cricut Expression, those with the Create or Baby Bug will learn techniques that allow them to use some of the advanced features.
You will need to bring your machine and mat to class as well as any tools you regularly use.
Don't own a Cricut but are thinking about it?
Join us to find out what this incredible machine is capable of.
Contact Gail to find out about dates for this class
scrappingailaz@gmail.com
Contact Gail to find out about dates for this class
scrappingailaz@gmail.com
* * * * *
EXPLORE YOUR CRICUT
In this class, you will continue to adjust your machine to cut a variety of material. We will be using commercial chipboard, metal, stencil material, mylar and vinyl as well as draw with the Cricut markers.
In order to cut the chipboard, you will need the Deep Cut Blade and Housing unit. If you are not interested in cutting this heavier material, you are still welcome to take the class. You will just skip that part of the activity. Lighter weight chipboard that can be cut with your regular blade will be available.
A new or nearly new mat will be necessary to be sure this heavier material is held on the mat. We will use the multi-cut feature of the Expression. If you have the Create or the original machine, you will learn a technique that allows you to do multi-cuts with your machine.
Here are some samples of what we will be cutting -

Stencils (photo below) - and then the material that you cut out from the center can be used as a mask to create an interesting effect on any project (photo above).
 We will also use clear mylar - from the quilting department. This material, designed for making quilting templates, is perfect for adding clear accents to your projects. See the sample above.
For this material, a design that has some cut-outs, like a butterfly, dragonfly, or fancy flower, will work well. Check your cartridges to see what you have available.
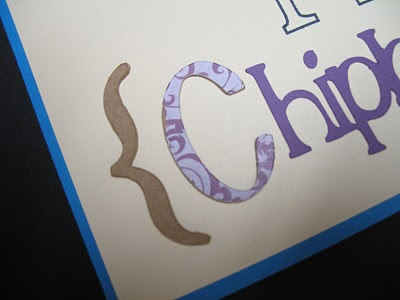
We will cut with commercial chipboard. This material is more dense than the cereal box "chipboard" we used in the first class, and will require the use of the Deep Cut Blade and Housing.
In addition to cutting the chipboard, we will learn techniques for getting the background paper on the shape you cut.

This is a sample of the way I used vinyl to label my machine. Each student will receive a piece of vinyl to cut and apply. Transfer tape will also be provided. It is important that you come up with the design you want to use before coming to class. If you use a laptop computer program or the Gypsy, you are welcome to bring those with you. Specifics about the design will be given to you when you register.
Here are some samples of other designs students have placed on their machines.


In addition to these materials, we will be cutting the QuicKutz adhesive-backed metal sheets, and everyone will have an opportunity to draw with the Cricut markers and then cut out your design. All materials for this class are included in the fee. You need to bring your machine, tools, designs, and a new - or fairly new - mat. It has to be really sticky to hold the heavier material during the multi-cuts. As before, I highly suggest the use of a surge protector for your machine, so bring that as well.
Part 2
Will be scheduled after a Part 1 class has been held
In this class, you will continue to adjust your machine to cut a variety of material. We will be using commercial chipboard, metal, stencil material, mylar and vinyl as well as draw with the Cricut markers.
This is a hands-on class, so you will need to bring your machine and all of your tools. Students will need to come to class with designs for cutting their vinyl and stencil material based on images on their own cartridges. I will give specifics for these when you register.
If you have not taken the first Cricut class, but are familiar with your machine, you are welcome to join us. If you are a new Cricut user, it is best to take the first class to get used to all of the features we will be using in this class.
Please feel free to contact me if you are interested in this class but aren't sure.
A new or nearly new mat will be necessary to be sure this heavier material is held on the mat. We will use the multi-cut feature of the Expression. If you have the Create or the original machine, you will learn a technique that allows you to do multi-cuts with your machine.
Here are some samples of what we will be cutting -


Stencils (photo below) - and then the material that you cut out from the center can be used as a mask to create an interesting effect on any project (photo above).

For this material, a design that has some cut-outs, like a butterfly, dragonfly, or fancy flower, will work well. Check your cartridges to see what you have available.

We will cut with commercial chipboard. This material is more dense than the cereal box "chipboard" we used in the first class, and will require the use of the Deep Cut Blade and Housing.
In addition to cutting the chipboard, we will learn techniques for getting the background paper on the shape you cut.

This is a sample of the way I used vinyl to label my machine. Each student will receive a piece of vinyl to cut and apply. Transfer tape will also be provided. It is important that you come up with the design you want to use before coming to class. If you use a laptop computer program or the Gypsy, you are welcome to bring those with you. Specifics about the design will be given to you when you register.
Here are some samples of other designs students have placed on their machines.


In addition to these materials, we will be cutting the QuicKutz adhesive-backed metal sheets, and everyone will have an opportunity to draw with the Cricut markers and then cut out your design. All materials for this class are included in the fee. You need to bring your machine, tools, designs, and a new - or fairly new - mat. It has to be really sticky to hold the heavier material during the multi-cuts. As before, I highly suggest the use of a surge protector for your machine, so bring that as well.
Next class dates are not set
Contact Gail with questions
scrappingailaz@gmail.com
* * * * *
* * * * *
EXPLORE YOUR CRICUT -- EMBOSSING FOLDERS
Contact me if you are interested in this class. A date has not yet been set, but when there is enough interest, I will schedule it.

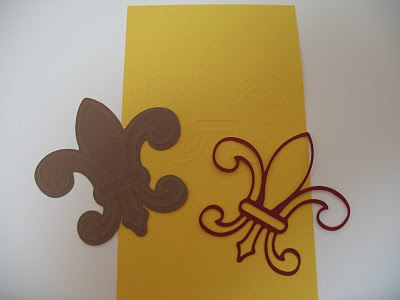
Once you have cut out your images, wouldn't it be nice to give them some dimension? Or maybe there's a special event coming up that you want to create an embossed image for. Now you can do both!
There are several ways you can use these folders. Just put your paper in and emboss, giving you an image on a full sheet of paper (click on the fleur-de-lis photo to see the details of the yellow embossed image up close). Or cut out the shadow of the image you created your folder of, then run that through your folder, and you have a cut-out embossed image (brown fleur-de-lis and ice cream cone). Make various layers, like the ice cream cone, for an outstanding look.

To make these embossing folders, you will need to bring your machine with the regular cutting blade, a tacky cutting mat, and your regular tools for the Cricut as well as scissors and a paper cutter. All of the cutting materials will be provided.
Once you register, you will be given instructions on selecting the images you will use for the embossing folders we will make in class. You will need to come to class with these images selected and sized for the projects.
Email me at scrappingailaz@gmail.com if you have ideas of what else should be included in future classes.
Contact me if you are interested in this class. A date has not yet been set, but when there is enough interest, I will schedule it.
scrappingailaz@gmail.com

Once you have cut out your images, wouldn't it be nice to give them some dimension? Or maybe there's a special event coming up that you want to create an embossed image for. Now you can do both!
Create embossing folders on the Cricut and then run them through your Cuttlebug or other roller die-cut machine for a 3-D effect. You will make one folder using Cricut materials, and learn alternate ways of making embossing folders using simple, easy to find materials and create 2 more folders. You will leave class with 3 completed embossing folders!
There are several ways you can use these folders. Just put your paper in and emboss, giving you an image on a full sheet of paper (click on the fleur-de-lis photo to see the details of the yellow embossed image up close). Or cut out the shadow of the image you created your folder of, then run that through your folder, and you have a cut-out embossed image (brown fleur-de-lis and ice cream cone). Make various layers, like the ice cream cone, for an outstanding look.


Once you register, you will be given instructions on selecting the images you will use for the embossing folders we will make in class. You will need to come to class with these images selected and sized for the projects.
Contact Gail for registration information
scrappingailaz@gmail.com
Email me at scrappingailaz@gmail.com if you have ideas of what else should be included in future classes.